Flying a drone in Belgium is no longer a matter of “just taking off”. Whether you fly recreationally or carry out professional missions for inspections, construction sites or real estate, proper preparation is essential. Ignoring the rules can lead not only to fines, but also to your flight being stopped on site.
In this article, we explain step by step how to:
- check whether you are allowed to fly at a specific location
- determine whether an official request is required
- correctly submit a flight via the Drone Service Application (DSA)
- know what to do on the day of the flight
This article builds on our earlier explanation of GeoZones and drone legislation in Belgium.
That basic knowledge remains important and can be read here:
https://www.droneview.be/en/stricter-drone-control-in-europe-how-to-check-where-you-can-fly-in-belgium/
Step 1: First check where you are allowed to fly – Droneguide
Every drone flight starts with one simple question: am I allowed to fly here?
The official map for this is the Droneguide map from skeyes.
Go to: https://map.droneguide.be
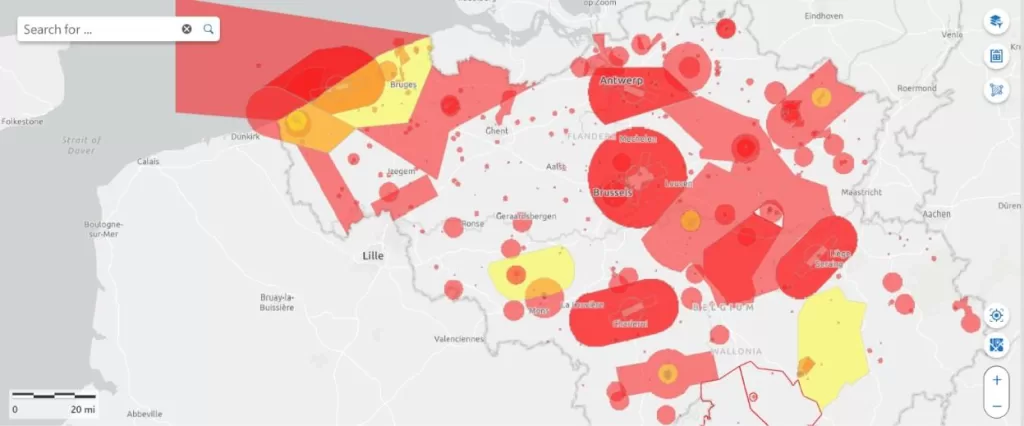
On this map, you can immediately see:
- prohibited zones (no-fly zones)
- warning zones
- zones with specific conditions (such as around airports, industry, ports or military areas)
Zoom in on your planned location and click on the zone. You will immediately receive additional information about:
- the type of GeoZone
- who manages the zone
- whether an authorisation is required
Important to remember:
The Droneguide map is an information tool.
It tells you whether flying is allowed, but it does not grant permission.
If you see that your location is in a GeoZone managed by skeyes (such as VLL zones around airports), a request via the DSA is mandatory.
Step 2: When do you need the DSA Planner?
You must use the Drone Service Application (DSA) whenever your flight takes place in:
- VLL zones (VLL 0, 1 or 2) around major Belgian airports
- EBKT zones around Kortrijk Airport
In these cases, the Droneguide map is for information only, and you must effectively submit and have your flight authorised.
The DSA consists of two parts:
- DSA Planner: to request your flight in advance
- DSA Fly: to activate your flight on the day itself (take-off and landing)

Step 3: Creating your DSA account
Before you can submit any flight, you must create an account.
Go to:
https://planner.skeydrone.tech/planner-app/#/login
Registration takes place in two steps:
- confirmation via e-mail
- confirmation via a unique mobile phone number
This phone number is important. It is used for identification and possible communication with skeyes.
Step 4: Correctly setting up your ‘assets’ first
A common mistake among new users: trying to create a flight immediately without any preparation.
In the DSA, everything works with so-called assets. You set these up once and reuse them for all your flights.
There are three mandatory assets:
- Operator
The operator is the legal entity responsible for the flight. This can be:
- a company
- a self-employed operator
- or yourself as a natural person
You always designate a contact person. If this is yourself, no additional approval is required.
- Crew members (pilots)
Each flight must have at least one pilot.
Here as well:
- if you are the pilot yourself, you simply add yourself
- if you add someone else, that person must explicitly approve the flight later
- UAV (the drone)
For each drone, you register:
- type and model
- relevant technical characteristics
- support for Remote ID or geo-awareness
Do you have multiple drones? Add them all. You will select the appropriate drone per flight later.
Step 5: Submitting a flight (Operation) in the DSA Planner
In the DSA, a flight is officially called an “Operation”.
Go to the Operations tab and click the plus icon to create a new operation.
You will now go through six tabs. Each tab must be correctly completed and turn green before you can submit.
- General
Here you describe your flight:
- a clear name
- a short description
- the type of activity (e.g. inspection, photography, measurement)
- Characteristics
In this tab, you select the flight category:
- Open (A1, A2 or A3)
- Specific (if applicable)
Not sure? It is strongly recommended to determine your correct category before continuing.
- Area Overview
This is one of the most important steps.
Here you define your flight area:
- manually on the map (polygon or circle)
- or by importing a KML, GPX or GeoJSON file
You also specify:
- maximum altitude in feet (AGL – Above Ground Level)
- exact start and end time in UTC
Pay close attention to time:
- winter time: Belgian time – 1 hour
- summer time: Belgian time – 2 hours
An incorrect UTC time is one of the most common reasons for approval issues.
- Height
Check whether your altitude is logical and compliant:
- Open category: maximum 120 m / 400 ft AGL
- Specific category: depending on the zone and grid limitations
- Time
Double-check the start and end time in UTC.
- Operator, UAV & Pilots
Here you simply select:
- the correct operator
- the correct drone
- the correct pilot or pilots
All of this is taken from the assets you created earlier.
Step 6: Take the submission deadlines into account
Not every zone is approved at the same speed.
These are the fixed minimum deadlines:
- VLL 2 (outer zone around airports): at least 2 hours in advance
- VLL 1 and EBKT 1: at least 8 working days in advance
- VLL 0 (above and near runways): at least 15 working days in advance
If you submit too late, your request will be automatically rejected.
Step 7: Confirmation and day of the flight – DSA Fly
For certain zones, an additional confirmation is required.
Flights in VLL 0 and VLL 1 must:
- be confirmed between midnight the day before and 3 hours before take-off
On the day of the flight, you use the DSA Fly web app:
- You request tactical authorisation shortly before take-off
- You receive an authorisation code
- In some zones, this code must be communicated to the control tower
During every flight in a skeyes zone, you are required to:
- register take-off
- register landing
Without these steps, your flight is not compliant, even if it was approved in advance.
Final thoughts
Correctly planning a drone flight in Belgium involves some administration, but once you are familiar with the system, it becomes a routine. By always checking first via Droneguide and then working correctly with the DSA Planner and DSA Fly, you avoid unpleasant surprises on site.
The DSA Planner User Manual can be downloaded here.
At Droneview.be, we do this daily for inspections, construction sites and professional assignments. No risks, just a flight that is legally and operationally correct.